mscharhag, Programming and Stuff;

A blog about programming and software development topics, mostly focused on Java technologies including Java EE, Spring and Grails.

Posts tagged with Groovy

  • Friday, 10 April, 2015

    What's new in Grails 3

    A few days ago Grails 3.0 was officially released. Grails is now based on Spring Boot, the build system changed from Gant to Gradle and significant parts of the framework have been rewritten. In this post we will have a look at all the major changes introduced by Grails 3.

    Updated file structure

    We will start with a screenshot that shows a fresh Grails 3 project created from the Grails command line using

    grails create-app hello
     

    grails 3 project structure

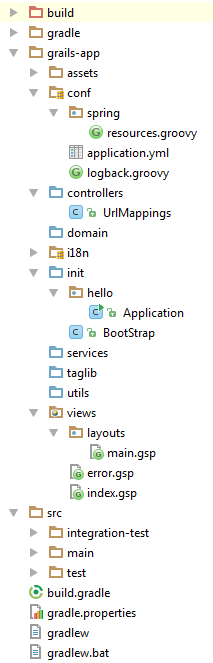
    The first two folders (build and gradle) are related to Gradle, the new build system in Grails 3. As the name implies, build is the directory where build related files like compiled classes and assembled packages are located. The gradle directory contains the Gradle Wrapper that allows you to build the project without a local Gradle installation.

    The content of the conf folder has also been changed. The default format for configuration files is now YAML. If you prefer to write your configuration in Groovy, you can still create a grails-app/conf/application.groovy configuration file manually.
    Logback is now the default logging provider. The logging configuration (previously part of Config.groovy) has been moved to conf/logback.groovy.
    Note that the conf folder is not a source directory anymore.

    init is a new folder in Grails 3. It contains Bootstrap.groovy (same content as in previous Grails versions) and the new Application main class (we will look into this in the Spring Boot section).

    The structure of the src folder has been changed to match Gradle conventions. Additional Java and Groovy files are now located in:
    src/main/java
    src/main/groovy
    src/test/java
    src/test/groovy

    build.gradle and gradle.properties contain the build configuration. BuildConfig.groovy from previous Grails versions does no longer exist.

    Spring 4.1 and Spring Boot

    Spring Boot is the new basis for Grails. According to Graeme Rocher Grails 3 is nothing less than a ground up rewrite on top of Spring Boot.

    Like Spring Boot applications Grails 3 projects come with an Application class that has a standard main() method. This means you can start a Grails 3 application simply by running the main class from your IDE.

    The default Application class looks like this:

    class Application extends GrailsAutoConfiguration {
      static void main(String[] args) {
        GrailsApp.run(Application)
      }
    }

    Note that the war file you get when packaging the application can now be executed using the java -jar command:

    java -jar build/libs/myApplication-0.1.war

    This runs the main method which starts the application using an embedded Tomcat server. Of course you can still deploy the war file on an application server of your choice like in previous Grails versions.

    The Application class acts as Spring configuration class. So, we can use Spring's @Bean annotation to define custom beans. Methods like onStartup() or onShutdown() can be overwritten if you want to execute custom code at certain application events.

    class Application extends GrailsAutoConfiguration {
    
      ...
     
      @Bean
      MyBean myBeanId() {
        return new MyBeanImpl();
      }
     
      @Override
      void onStartup(Map<String, Object> event) {
        super.onStartup(event)
       // custom startup code..
      }
    } 
    

    Grails 3 uses Traits

    In Grails components like Controllers or Domain classes always had some magically attached functionality. For example, in Controllers you can use methods like render(), redirect() or getParams() without subclassing another class. In Grails 3 these features have been rewritten to make use of Traits introduced by Groovy 2.3.
    Certain Traits are automatically attached to Controllers, Services, Tag libraries and so on to make framework methods available. For example, a Controller automatically gets the following Traits: TagLibraryInvoker, AsyncController, RestResponder, Controller.

    The cool thing with Traits is that you can easily add them to your own classes.
    For example: Assume you want to access the request and params objects outside a Grails Controller. All you have to do now is adding the WebAttributes trait to your class:

    class MyCustomComponent implements WebAttributes {
    
      public MyCustomComponent() {
    
        // make use of WebAttributes methods like getWebRequest() or getParams()
        println "base url: " + webRequest.baseUrl
        println "params: " + params
        ...
      }
    }

    Interceptors

    Grails 3 introduced standalone Interceptors. Interceptors can intercept incoming requests to perform common tasks (e.g. logging, authentication, etc.).

    A new Interceptor can be created using create-interceptor command:
    grails create-interceptor MyInterceptor

    A newly created Interceptor looks like this:

    class MyInterceptor {
    
      boolean before() { 
        // executed before a request is processed by a controller
        true 
      }
    
      boolean after() {
        // executed after a request is processed by a controller
        true
      }
    
      void afterView() { 
        // executed after the view has been rendered
      }
    
    }

    Interceptors replace Filters used by previous Grails versions. Filters still work in Grails 3 for backwards compatibility. However, they are considered deprecated now.

    If you are aware of Spring web MVC, you can easily see the similarities to Springs Handler Interceptor.

    Gradle builds

    As mentioned before, Grails 3 uses Gradle instead of Gant as build system. Gradle is used for tasks like compilation, running tests and packaging the application.
    When a Grails command like grails clean is executed, the job is delegated to the corresponding Gradle task (e.g. gradle clean). The Gradle-Wrapper shipped with Grails 3 is used for this.
    If you want to use a local installation of Gradle you can execute the Gradle task directly with your own Gradle version. Gradle 2.2 or newer is recommended.

    The following table shows Grails commands and their corresponding Gradle tasks:

    Grails command      Gradle Task
    clean clean
    compile classes
    package assemble
    run-app run
    test-app test
    war assemble


    BuildConfig.groovy from previous Grails versions has been completely replaced by the Gradle configuration (build.gradle). Third party dependencies are now defined in build.gradle:

    dependencies {
      compile 'org.grails.plugins:hibernate' 
      compile 'org.grails.plugins:cache' 
      compile 'org.hibernate:hibernate-ehcache'
      runtime 'org.grails.plugins:asset-pipeline' 
      runtime 'org.grails.plugins:scaffolding'
      ...
    }

    For more details, you can have a look at Dependency Management Guide in the Gradle documentation.

    Grails profiles

    Whenever you run the create-app command Grails 3 will use a Profile to create a new app.
    A Profile encapsulates project structure, commands, templates and plugins. By default Grails 3 uses the web Profile, which creates an app like shown in the screenshot above.

    To create a project with a different Profile, you can use the --profile parameter:

    grails create-app myapp --profile=web-plugin

    Grails 3 comes with three different Profiles:

    • web for standard Grails web applications
    • web-plugin for web application plugins
    • web-micro a minimal micro service application

    Short summary

    Grails 3 comes with major changes. The code basis changed to Spring Boot, Gant was replaced with Gradle, existing features were reimplemented using Traits and new features like Profiles and Interceptors were added.
    With all those changes it can become quite challenging to upgrade an existing Grails 2.x application to Grails 3 (all Plugins need to be updated first). If you plan to Upgrade to Grails 3, you should have a look at the Grails 3 upgrade guide.

  • Friday, 6 February, 2015

    Creating Android Apps with Groovy 2.4

    A few days ago Groovy 2.4 was released. One of the major news is that Groovy now officially supports Android application development. To see how this works I used Groovy to create a small ToDo list example application for Android. In this post I will show which steps are required to create an Android application with Groovy and how Groovy can simplify Android application development.

    The following screen shows the example application written in Groovy. You can find the full source code on GitHub.
     

    Groovy app screenshot


    Running Groovy on Android

    First we need Android Studio which already contains the latest Version of the Android SDK. Over last year the default Android environment changed from Eclipse and Ant to Android Studio (build on IntelliJ) and Gradle. To run Groovy on Android we will need a Gradle Plugin, so make sure you are not using the old Eclipse/Ant based development tools.

    We create a new Android project in Android Studio and add the following lines to our build files:

    Top level build file (<project>/build.gradle):

    buildscript {
      ..
      dependencies {
        ..
        classpath 'org.codehaus.groovy:gradle-groovy-android-plugin:0.3.5'
      }
    }


    App build file (<project>/app/build.gradle):

    apply plugin: 'com.android.application'
    
    // apply Groovy Android plugin after the standard Android plugin
    apply plugin: 'groovyx.grooid.groovy-android'
    
    dependencies {
      ..
      compile 'org.codehaus.groovy:groovy:2.4.0:grooid'
    }

    Source and documentation of the Groovy Android Gradle Plugin can be found on GitHub.

    This is all configuration we need, now we can move straight to Groovy code.

    Please note that Groovy code files need to be placed in src/main/groovy instead of src/main/java. Adding Groovy files to src/main/java will not work!

    Developing Android apps in Groovy works exactly the same way as in Java. Because of Groovy's  Java interoperability, you can use and extend Android classes like you would do in Java.

    Improving the Groovy experience in Android Studio

    Android Studio already contains the Groovy plugin. So, you get Groovy syntax support out of the box.

    However, you might miss the option to create new Groovy classes from the context menu. Luckily this can be easily configured in Android Studio. You simply have to create a new File Template (Settings > File and code templates) and add the following template code:

    #if (${PACKAGE_NAME} && ${PACKAGE_NAME} != "")package ${PACKAGE_NAME};#end
    class ${NAME} {
    }


    androidstudio groovy file template setup (1)


    Now you can quickly create new Groovy classes using the context menu:

    androidstudio groovy file template setup (2)


    You might also look into this plugin which fixes the issue that you get no auto completion when overriding super class methods in Groovy. Thanks to @arasthel92 who told me about this plugin.

    Running Groovy applications

    Running Groovy apps is identical to running Java apps. We can simply press the run (or debug) button in Android Studio and deploy the application to a connected (or emulated) device.
    The cool thing is that the Groovy debugger works out of the box. We can debug running Groovy applications from Android Studio.


    androidstudio debug groovy app


    The great parts

    The cool thing about Groovy is that it reduces the lines of code you need to write a lot. Its dynamic nature also lets you get rid of all the type casts that are typically required when working with Android.

    One example of this can be found in ToDoListActivity.onResume(). In this method the data of an Android ListAdapter is modified. With Java this would look like this:

    ArrayAdapter<ToDo> adapter = (ArrayAdapter<ToDo>) getListAdapter();
    ToDoApplication application = (ToDoApplication) getApplication()
    adapter.clear()
    adapter.addAll(application.getToDos());
    adapter.notifyDataSetChanged()

    With Groovy we can simply rewrite it like this:

    listAdapter.clear()
    listAdapter.addAll(application.toDos)
    listAdapter.notifyDataSetChanged()

    Groovy's closures are another feature that comes very handy when working with Android.

    To add a click listener to a button you write something like this in Java

    Button button = (Button) findViewById(R.id.newTodoButton);
    button.setOnClickListener(new View.OnClickListener() {
      @Override
      void onClick(View v) {
        ...
      }
    });

    With Groovy it is just

    def button = findViewById(R.id.newTodoButton)
    button.onClickListener = {
      ...
    }

    See CreateNewTodoActivity for a complete example.

    Be aware of runtime errors

    Dynamic languages typically tend to increase the number of errors you find at runtime. Depending on the app you are building this can be a serious issue. Larger Apps can have a significant deployment time (the app needs to be packaged, copied via USB to the device, installed and started on the device).
    Groovy's @CompileStatic annotation can be used to tackle this issue. It can be used to compile parts of your Groovy code statically to reduce runtime errors:

    @CompileStatic
    class ToDoListActivity extends ListActivity {
      ..
    }

    The downside of @CompileStatic is that you can (obviously) no longer use Groovy's dynamic features. 

    Quick summary

    It is very easy to get Groovy running on Android. Because of Groovy's interoperability with Java it is also very easy to mix Groovy and Java in the same application. The Groovy integration in Android Studio is actually better than I have expected (however, some manual tweaks are still required).

  • Thursday, 17 April, 2014

    Groovy 2.3 introduces traits

    A few days ago the second beta of Groovy 2.3 got released. One of the major new Groovy 2.3 features are traits. A trait is a reusable set of methods and fields that can be added to one or more classes. A class can be composed out of multiple traits without using multiple inheritance (and therefore avoiding the diamond problem).

    Basic usage of Groovy Traits

    The following piece of code shows a basic definition of a trait in Groovy 2.3.

    trait SwimmingAbility {
      def swim() {
        println "swimming.."
      }
    }

    A trait definition looks very similar to a class definition. This trait defines a single method swim(). We can add this trait to a class using the implements keyword:

    class Goldfish implements SwimmingAbility {
      ..
    }

    Now we are able to call the swim() methods on Goldfish objects:

    def goldfish = new Goldfish()
    goldfish.swim()

    So far we could have accomplished the same using inheritance. The difference is that we can add multiple traits to a single class. So let's define another trait:

    trait FlyingAbility {
      def fly() {
        println "flying.."
      }
    }

    We can now create a new class that makes use of both traits:

    class Duck implements SwimmingAbility, FlyingAbility {
      ..
    }

    Ducks can swim and fly now:

    def duck = new Duck()
    duck.swim()
    duck.fly()

    this inside traits

    Inside traits the this keyword represents the implementing instance. This means you can write the following:

    trait FlyingAbility {
      def fly() {
        println "${this.class.name} is flying.."
      }
    }

    In case of the Duck class from above this will print

    Duck is flying..

    if we call duck.fly().

    A more complex example

    Now let's look at an example that shows some more features of Groovy traits

    trait Trader {
    
      int availableMoney = 0
      private int tradesDone = 0
    
      def buy(Item item) {
        if (item.price <= availableMoney) {
          availableMoney -= item.price
          tradesDone += 1
          println "${getName()} bought ${item.name}"
        }
      }
    
      def sell(Item item) {
        ..
      }
    
      abstract String getName()
    }

    Like Groovy classes traits support properties. Here the property availableMoney will become private and public getter / setter methods will be generated. These methods can be accessed on implementing classes. tradesDone is a private variable that cannot be accessed outside the Trader trait. Within this trait we defined an abstract method getName(). This method has to be implemented by classes that make use of this trait.

    Let's create a class that implements our Trader trait:

    class Merchant implements Trader {
      
      String name
    
      String getName() {
        return this.name
      }
    }

    A Merchant is now be able to buy items:

    def bike = new Item(name: 'big red bike', price: 750)
    def paul = new Merchant(name: 'paul')
    
    paul.availableMoney = 2000
    paul.buy(bike) // prints "paul bought big red bike"
    
    println paul.availableMoney // 1250

    Extending from traits, Overriding and conflict resolution

    A trait can inherit functionality from another trait using the extends keyword:

    trait Dealer {
      def getProfit() { ... }
      def deal() { ... }
    }
    
    trait CarDealer extends Dealer {
      def deal() { ... }
    }

    Here the CarDealer trait extends Dealer and overrides the deal() method of Dealer.

    Trait methods can also be overwritten in implementing classes:

    class OnlineCarDealer implements CarDealer {
      def deal() { ... }
    }

    If a class implements more than one trait it is possible to create a conflict. That's the case if two or more traits define a method with an identical signature:

    trait Car {
      def drive() { ... }
    }
    
    trait Bike {
      def drive() { ... }
    }
    
    class DrivingThing implements Car, Bike { ... }

    In such a situation the last declared trait wins (Bike in this example).

    Conclusion

    I think traits are a very useful concept and I am happy to see them in Groovy. Other than Groovy mixins traits work at compile time and can therefore be accessed from Java code. For further reading I can recommend the Groovy 2.3 Trait documentation.

  • Saturday, 12 April, 2014

    The Grails depedency injection inheritance pitfall

    This blog post is about a small pitfall you should be aware of when combining dependency injection in Grails with inheritance.

    I think the problem is best explained with a piece of example code. So let's look at the following two definitions of Grails controllers.

    class FooController {
      TestService testService
    
      def foo() {
        // do something with testService
      }
    }
    class BarController extends FooController {
      TestService testService
    
      def bar() {
        // do something with testService
      }
    }

    Both controllers look nearly identical. The only difference is that BarController extends FooController. Now assume we have an instance of BarController and we want to call the methods bar() and foo() on it. Guess what happens?

    The call of bar() works fine while the call of foo() throws a NullPointerException because testService is null.

    testService is a standard Groovy property. This means that the testService fields will become private and getter / setter methods are generated for both controllers. The getter / setter of BarController override the getter / setter of FooController. So whenever the dependency is injected using setTestService() only BarController retrieves the TestService instance. This is nothing special about Grails controllers, it works the same for services and other Groovy classes.

    The solution is easy: Remove the testService dependency from BarController. Whenever testService is accessed in BarController, it will use the appropriate getter of FooController and everything works.

    In this simple example the problem is quite obvious and can be easily solved. However, if your classes become larger this can be a bit tricky to debug. Assume you have a base class with multiple sub classes. Whenever you want to add a new dependency to your base class, you have to check all the subclasses. If one of the sub classes already defines the same dependency you have to remove it or it will not be available in your base class.

  • Saturday, 5 April, 2014

    Closure composition in Groovy

    This is a short blog post about a feature of Groovy closures I discovered a few days ago: Closure Composition.

    With Closure Composition we can chain closure calls within a single closure.

    Assume we have the following three closures:
    def square = { it * it }
    def plusOne = { it + 1 }
    def half = { it / 2 }
    Now we can combine those closures using the << or >> operators:
    def c = half >> plusOne >> square
    If we now call c() first half() will be called. The return value of half() will then be passed to plusOne(). At last square() will be called with the return value of plusOne().
    println c(10) // (10 / 2 + 1)² -> 36
    We can reverse the call order by using the << operator instead of >>
    def c = half << plusOne << square
    Now square() will be called before plusOne(). half() will be called last.
    println c(10) // (10² + 1) / 2 -> 50.5
  • Saturday, 15 March, 2014

    How you can benefit from Groovy Shell

    This is a post about the Groovy Shell and how it can help you with your daily work (as long as you are working as software developer). You can benefit from the Groovy Shell no matter what programming language(s) or technologies you are using. The only real requirement is that you are able to write (and read) small pieces of Groovy code.

    Getting started
    I think the purpose of the Groovy shell is best described by the official documentation:

    The Groovy Shell, aka. groovysh is a command-line application which allows easy access to evaluate Groovy expressions, define classes and run simple experiments.

    The Groovy Shell is included in the distribution of the Groovy Programming language and can be found in <groovy home>/bin. To start the Groovy Shell simply run groovysh from the command line:

    GROOVY_HOME\bin>groovysh
    Groovy Shell (2.2.2, JVM: 1.7.0)
    Type 'help' or '\h' for help.
    --------------------------------------------------------------------
    groovy:000>

    Within the shell you can now run Groovy commands:

    groovy:000> println("hu?")
    hu?
    ===> null
    groovy:000>

    It supports variables and multi line statements:

    groovy:000> foo = 42
    ===> 42
    groovy:000> baz = {
    groovy:001> return 42 * 2
    groovy:002> }
    ===> groovysh_evaluate$_run_closure1@3c661f99
    groovy:000> baz(foo)
    ===> 84
    groovy:000>

    (Note that you have to skip the def keyword in order to use variables and closures later)

    A few words for Windows Users
    I can clearly recommend Console(2) which is a small wrapper around the awkward cmd window. It provides Tab support, better text selection and other useful things.
    Unfortunately the Groovy 2.2.0 shell has a problem with arrow keys on Windows 7/8 in some locales (including German). However, you can use CTRL-P and CTRL-N instead of UP and DOWN. As an alternative you can use the shell of an older Groovy Version (groovysh from Groovy 2.1.9 works fine).

    So, for what can we use it?
    The most obvious thing we can do is evaluating Groovy code. This is especially useful if you are working on applications that make use of Groovy.
    Maybe you know you can use the << operator to add elements to lists, but you are not sure if the operator works the same for maps? In this case, you can start googling or look it up in the documentation. Or you can just type it into Groovy Shell and see if it works:

    groovy:000> [a:1] << [b:2]
    ===> {a=1, b=2}

    It works!
    You are not sure if you can iterate over enum values?

    groovy:000> enum Day { Mo, Tu, We }
    ===> true
    groovy:000> Day.each { println it }
    Mo
    Tu
    We
    ===> class Day

    It works too!

    It is a Calculator!
    The Groovy Shell can be used for simple mathematical calculations:

    groovy:000> 40 + 2
    ===> 42
    groovy:000>
    groovy:000> 123456789123456789 * 123456789123456789123456789
    ===> 15241578780673678530864199515622620750190521
    groovy:000>
    groovy:000> 2 ** 1024
    ===> 179769313486231590772930519078902473361797697894230657273430081157732675805500963132708477322407536021120113879871393357658789768814416622492847430639474124377767893424865485276302219601246094119453082952085005768838150682342462881473913110540827237163350510684586298239947245938479716304835356329624224137216
    groovy:000>

    As you can see Groovy can work well with numbers that would cause overflows in other programming languages. Groovy uses BigInteger and BigDecimal for these computations. By the way, you can verify this yourself very quickly:

    groovy:000> (2 ** 1024).getClass()
    ===> class java.math.BigInteger

    Note that Groovy math tries to be as natural as possible:

    groovy:000> 3/2
    ===> 1.5
    groovy:000> 1.1+0.1
    ===> 1.2

    In Java these computations would result in 1 (integer division) and 1.2000000000000002 (floating point arithmetic).

    Do more
    Maybe you need the content of a certain web page? This can be easily accomplished with Groovy:

    groovy:000> "http://groovy.codehaus.org".toURL().text
    ===> <!DOCTYPE html>
    <html>
    <head>
        <meta charset="utf-8"/>
        <meta http-equiv="content-type" content="text/html; charset=utf-8"/>
        <meta name="description" content="Groovy Wiki"/>
        ...

    Maybe you only want the <meta> tags for some reason?

    groovy:000> "http://groovy.codehaus.org".toURL().eachLine { if (it.contains('<meta')) println it }
        <meta charset="utf-8"/>
        <meta http-equiv="content-type" content="text/html; charset=utf-8"/>
        <meta name="description" content="Groovy Wiki"/>
        <meta name="keywords"
        <meta name="author" content="Codehaus Groovy Community"/>
    ===> null

    I am sure you were in a situation where you needed the url encoded version of some text:

    groovy:000> URLEncoder.encode("foo=bar")
    ===> foo%3Dbar

    Of course you do not need to remember the exact class and method names. Just type in the first characters and then press tab to get the possible options:

    groovy:000> URL
    URL                       URLClassLoader            URLConnection             URLDecoder                URLEncoder
    URLStreamHandler          URLStreamHandlerFactory

    It works with methods too:

    groovy:000> URLEncoder.e
    each(            eachWithIndex(   encode(          every(           every()


    Customize it
    To truly benefit from the Groovy Shell you should customize it to your needs and provide functions that help you in your daily work. For this you can add your custom Groovy code to $HOME/.groovy/groovysh.profile (just create the file if it does not exist). This file is loaded and executed when groovysh starts.

    Let's assume you want to decode a piece of Base64 encoded text. A viable approach is to start googling for an online Base64 decoder. An alternative is to add a few lines to your groovysh.profile to accomplish the job:

    encodeBase64 = { str ->
      return str.bytes.encodeBase64().toString()
    }
    
    decodeBase64 = { str ->
      return new String(str.decodeBase64())
    }

    Now you can use the encodeBase64() and decodeBase64() functions within Groovy Shell to do the job:

    groovy:000> encoded = encodeBase64('test')
    ===> dGVzdA==
    groovy:000> decodeBase64(encoded)
    ===> test

    This approach might be a bit slower the first time you are using it but you will benefit from it the next time you need to encode/decode a Base64 message. Note that autocomplete also works on your own  methods, so you do not need to remember the exact name.

    Another example function that can be useful from time to time is one that computes the MD5 hash from a passed string. We can use Java's MessageDigest class to accomplish this task in Groovy:

    import java.security.MessageDigest
    
    md5 = { str ->
      // thanks to https://gist.github.com/ikarius/299062
      MessageDigest digest = MessageDigest.getInstance("MD5")
      digest.update(str.bytes)
      return new BigInteger(1, digest.digest()).toString(16).padLeft(32, '0')
    } 

    To compute a MD5 hash we then just have to call the md5() function:

    groovy:000> md5('test')
    ===> 098f6bcd4621d373cade4e832627b4f6

    But what if we want to compute the MD5 value of a file?
    If the file is not that large getting the content of it is as simple as this:

    new File('test.txt').text

    We just have to pass this to the md5() function to compute the md5 hash of the file:

    groovy:000> md5(new File('test.txt').text)
    ===> a4ba431c56925ce98ff04fa7d51a89bf

    Maybe you are working a lot with date and times. In this case it can be useful to add Joda-Time support to your Groovy Shell. Just add the following lines to groovysh.profile:

    @Grab('joda-time:joda-time:2.3') import org.joda.time.DateTime
    import org.joda.time.DateTime

    If you run groovysh the next time Joda-Time will be downloaded using Grape. Additionally the Joda DateTime class is imported so it can be used in Groovy Shell without prefixing the package name:

    groovy:000> new DateTime().plusDays(42)
    ===> 2014-04-22T22:27:20.860+02:00

    You commonly need to convert time values to/from unix timestamps?
    Just add two simple functions for it and you no longer need your bookmark for an online converter:

    import java.text.SimpleDateFormat
    dateFormat = new SimpleDateFormat('yyyy-MM-dd HH:mm:ss')
    
    toUnixTimestamp = { str ->
      return dateFormat.parse(str).getTime() / 1000
    }
    
    fromUnixTimestamp = { timestamp ->
      return dateFormat.format(new Date(timestamp.toLong() * 1000))
    }

    Usage in Groovy Shell:

    groovy:000> toUnixTimestamp('2014-04-15 12:30:00')
    ===> 1397557800
    groovy:000> fromUnixTimestamp('1397557800')
    ===> 2014-04-15 12:30:00

    Maybe you want to execute a command on a remote machine?
    You only need another simple function to accomplish this task with Groovy Shell:

    ssh = { cmd ->
      def proc = "ssh -i keyfile user@host $cmd".execute()
      proc.waitFor()
      println "return code: ${proc.exitValue()}"
      println "stderr: ${proc.err.text}"
      println "stdout: ${proc.in.text}" 
    }

    Usage:

    groovy:000> ssh 'ls -l'
    return code: 0
    stderr:
    stdout: total 1234
    -rw-r--r-- 1 foo foo 7678563 Oct 28  2009 file
    drwxr-xr-x 4 foo foo    4096 Mar  1 17:07 folder
    -rw-r--r-- 1 foo foo      19 Feb 27 22:19 bar
    ...

    In case you did not know: In Groovy you can skip parentheses when calling a function with one or more parameters. So ssh 'ls -l' is the same as ssh('ls -l').

    Conclusion
    Before I switched to the Groovy Shell, I used the Python shell for nearly the same reasons (even if I was not working with Python at all). Within the last year I used a lot of Groovy and I quickly discovered that the Groovy Web Console is a very valuable tool for testing and prototyping. For me the Groovy Shell replaced both tools. It is clearly a development tool I do not want to miss.

    I think it is really up to you how much you let the Groovy Shell help you.