A few days ago Groovy 2.4 was released. One of the major news is that Groovy now officially supports Android application development. To see how this works I used Groovy to create a small ToDo list example application for Android. In this post I will show which steps are required to create an Android application with Groovy and how Groovy can simplify Android application development.
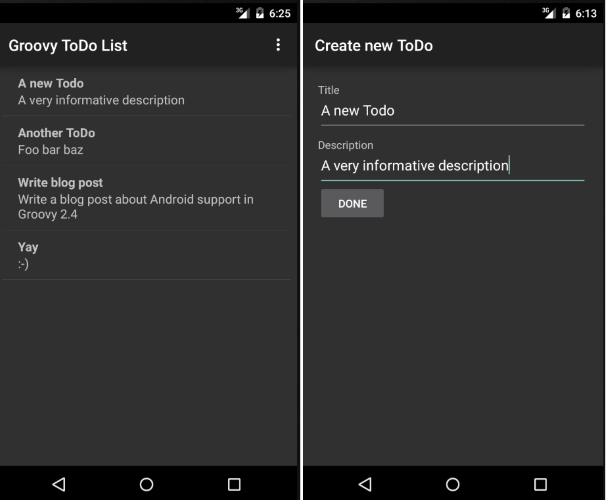
The following screen shows the example application written in Groovy. You can find the full source code on GitHub.
Running Groovy on Android
First we need Android Studio which already contains the latest Version of the Android SDK. Over last year the default Android environment changed from Eclipse and Ant to Android Studio (build on IntelliJ) and Gradle. To run Groovy on Android we will need a Gradle Plugin, so make sure you are not using the old Eclipse/Ant based development tools.
We create a new Android project in Android Studio and add the following lines to our build files:
Top level build file (<project>/build.gradle):
buildscript {
  ..
  dependencies {
    ..
    classpath 'org.codehaus.groovy:gradle-groovy-android-plugin:0.3.5'
  }
}
App build file (<project>/app/build.gradle):
apply plugin: 'com.android.application'

// apply Groovy Android plugin after the standard Android plugin
apply plugin: 'groovyx.grooid.groovy-android'

dependencies {
  ..
  compile 'org.codehaus.groovy:groovy:2.4.0:grooid'
}
Source and documentation of the Groovy Android Gradle Plugin can be found on GitHub.
This is all configuration we need, now we can move straight to Groovy code.
Please note that Groovy code files need to be placed in src/main/groovy instead of src/main/java. Adding Groovy files to src/main/java will not work!
Developing Android apps in Groovy works exactly the same way as in Java. Because of Groovy's Java interoperability, you can use and extend Android classes like you would do in Java.
Improving the Groovy experience in Android Studio
Android Studio already contains the Groovy plugin. So, you get Groovy syntax support out of the box.
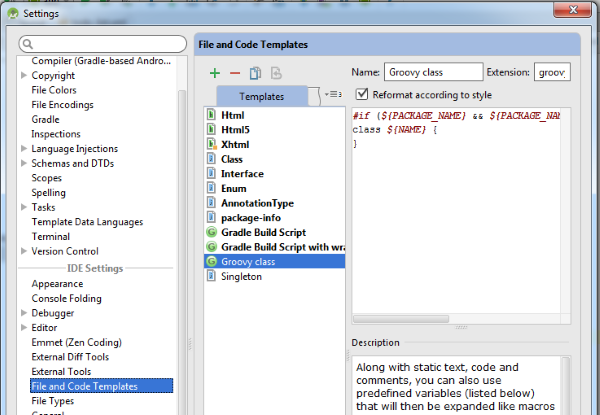
However, you might miss the option to create new Groovy classes from the context menu. Luckily this can be easily configured in Android Studio. You simply have to create a new File Template (Settings > File and code templates) and add the following template code:
#if (${PACKAGE_NAME} && ${PACKAGE_NAME} != "")package ${PACKAGE_NAME};#end
class ${NAME} {
}
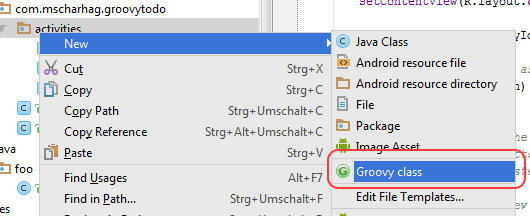
Now you can quickly create new Groovy classes using the context menu:
You might also look into this plugin which fixes the issue that you get no auto completion when overriding super class methods in Groovy. Thanks to @arasthel92 who told me about this plugin.
Running Groovy applications
Running Groovy apps is identical to running Java apps. We can simply press the run (or debug) button in Android Studio and deploy the application to a connected (or emulated) device.
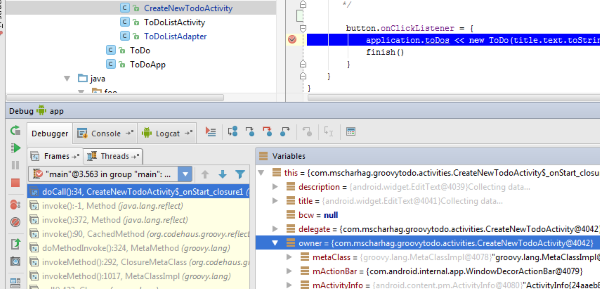
The cool thing is that the Groovy debugger works out of the box. We can debug running Groovy applications from Android Studio.
The great parts
The cool thing about Groovy is that it reduces the lines of code you need to write a lot. Its dynamic nature also lets you get rid of all the type casts that are typically required when working with Android.
One example of this can be found in ToDoListActivity.onResume(). In this method the data of an Android ListAdapter is modified. With Java this would look like this:
ArrayAdapter<ToDo> adapter = (ArrayAdapter<ToDo>) getListAdapter();
ToDoApplication application = (ToDoApplication) getApplication()
adapter.clear()
adapter.addAll(application.getToDos());
adapter.notifyDataSetChanged()
With Groovy we can simply rewrite it like this:
listAdapter.clear()
listAdapter.addAll(application.toDos)
listAdapter.notifyDataSetChanged()
Groovy's closures are another feature that comes very handy when working with Android.
To add a click listener to a button you write something like this in Java
Button button = (Button) findViewById(R.id.newTodoButton);
button.setOnClickListener(new View.OnClickListener() {
  @Override
  void onClick(View v) {
    ...
  }
});
With Groovy it is just
def button = findViewById(R.id.newTodoButton)
button.onClickListener = {
  ...
}
See CreateNewTodoActivity for a complete example.
Be aware of runtime errors
Dynamic languages typically tend to increase the number of errors you find at runtime. Depending on the app you are building this can be a serious issue. Larger Apps can have a significant deployment time (the app needs to be packaged, copied via USB to the device, installed and started on the device).
Groovy's @CompileStatic annotation can be used to tackle this issue. It can be used to compile parts of your Groovy code statically to reduce runtime errors:
@CompileStatic
class ToDoListActivity extends ListActivity {
  ..
}
The downside of @CompileStatic is that you can (obviously) no longer use Groovy's dynamic features.
Quick summary
It is very easy to get Groovy running on Android. Because of Groovy's interoperability with Java it is also very easy to mix Groovy and Java in the same application. The Groovy integration in Android Studio is actually better than I have expected (however, some manual tweaks are still required).
